Migrating to Cloudflare
After joining Cloudflare in April 2021, I recognized the amazing potential of Cloudflare Pages and all of its other products, so I decided to migrate my website from Netlify to Cloudflare (sorry Netlify – it was nice!).
Table of Contents
My Personal Website
Step 0: Cloudflare Pages
First, I created a FREE account on Cloudflare, and connected my GitHub repository with Cloudflare Pages.
I had to tweak the deployment a little by adding the build command:
hugo --gc --minify -b https://YOUR_DOMAIN.com/
Additionally, I had to set an Environment Variable:
HUGO_VERSION 0.80.0
After that, the page deployed and worked just fine.
Step 1: DNS
Now, go to dash.cloudflare.com and add your custom domain. Choose the FREE plan for starters, and simply follow the next steps – which will be to change your domain’s Nameservers to Cloudflare’s in order to do a Full Setup and enjoy the full range of solutions and features; (alternatively, it’s also possible to do a CNAME Setup or Partial Setup).
On the DNS tab, add the following DNS records in order to connect to the page on Cloudflare Pages:
CNAME   davidtofan.com    CLOUDFLARE-PAGES.pages.dev   Auto
CNAME   www               CLOUDFLARE-PAGES.pages.dev   Auto
Make sure that there are orange cloud icons  next to the DNS records, which mean that traffic to those hostnames is running / proxied through Cloudflare.
Some other benefits of the orange cloud DNS records are:
- Masking your Origin IP
- Caching
- an HTTPS certificate on the edge servers (a separate certificate on your server is still necessary)
NOTE: only A, AAAA and CNAME records should have the orange cloud / be proxied. For non web traffic, such as TCP or UDP protocols, solutions such as Spectrum can help. Alternatively, a gray-cloud icon (DNS-only) does not proxy traffic.
Furthermore, I also added an empty MX record because I do not use this domain for emails nor do I want to receive emails, which is set to DNS-only:
MX davidtofan.com . Auto
Step 2: Domain
In order to redirect www to davidtofan.com, go to Page Rules > Forwarding URL and set up the following Permanent Redirect Rule 301:
Matching URL:
www.davidtofan.com/*
Destination URL:
https://davidtofan.com/$1
Note: the DNS records need to be configured properly for this to work.
Then, I activated the DNSSEC function to add an extra layer of protection to my domain.
Step 3: Workers
Now on to Workers – it’s simply amazing! You can deploy serverless code instantly across the globe.
I used this JavaScript template to create HTTP Security Headers for my website by using Workers:
let securityHeaders = {
    "Content-Security-Policy": "default-src 'self'; upgrade-insecure-requests; script-src 'self' https://static.cloudflareinsights.com; img-src 'self'; object-src 'none'; form-action 'none'; base-uri 'self'; worker-src 'none'; connect-src 'self' https://static.cloudflareinsights.com/ https://cloudflareinsights.com/; child-src 'none'; frame-src 'none'; frame-ancestors 'none';",
    "Strict-Transport-Security": "max-age=63072000; includeSubDomains; preload",
    "X-XSS-Protection": "1; mode=block",
    "X-Frame-Options": "DENY",
    "X-Content-Type-Options": "nosniff",
    "Referrer-Policy": "no-referrer",
    "Permissions-Policy": "fullscreen=(self), autoplay=(), geolocation=(), microphone=(), camera=(), payment=(), interest-cohort=()",
    "Access-Control-Allow-Origin": "https://cloudflareinsights.com/"
}
let sanitiseHeaders = {
    Server: "My new server header"
}
let removeHeaders = [
    "Public-Key-Pins",
    "X-Powered-By",
    "X-AspNet-Version"
]

addEventListener('fetch', event => {
	event.respondWith(addHeaders(event.request))
})

async function addHeaders(req) {
	let response = await fetch(req)
	let newHdrs = new Headers(response.headers)

	if (newHdrs.has("Content-Type") && !newHdrs.get("Content-Type").includes("text/html")) {
        return new Response(response.body , {
            status: response.status,
            statusText: response.statusText,
            headers: newHdrs
        })
	}

	Object.keys(securityHeaders).map(function(name, index) {
		newHdrs.set(name, securityHeaders[name]);
	})

	Object.keys(sanitiseHeaders).map(function(name, index) {
		newHdrs.set(name, sanitiseHeaders[name]);
	})

	removeHeaders.forEach(function(name){
		newHdrs.delete(name)
	})

	return new Response(response.body , {
		status: response.status,
		statusText: response.statusText,
		headers: newHdrs
	})
}
Don’t forget to add https://static.cloudflareinsights.com to your script-src directive and https://cloudflareinsights.com to your connect-src directive, in order to make Web Analytics work on Cloudflare.
Feel free to change any details and adapt it to your needs. If you need help with the Content Security Policy (CSP), then check out my other article.
Code source: The brand new Security Headers Cloudflare Worker
Alternative code: Set security headers - Workers
OCTOBER 2021 UPDATE: Cloudflare announced support for _headers and _redirects files. Simply create the files in the build directory of your project and within it, define the rules you want to apply.
For example, to prevent your pages.dev deployment from being indexed and improve SEO:
https://:project.pages.dev/*
  X-Robots-Tag: noindex
More information here: Custom Headers for Cloudflare Pages
Step 4: Firewall
Now we set up a Firewall Rule on the Firewall Tab > Firewall Rules, such as for example to block some python requests on my website:
(http.user_agent contains "python")
There are some interesting examples on Runcloud Blog.
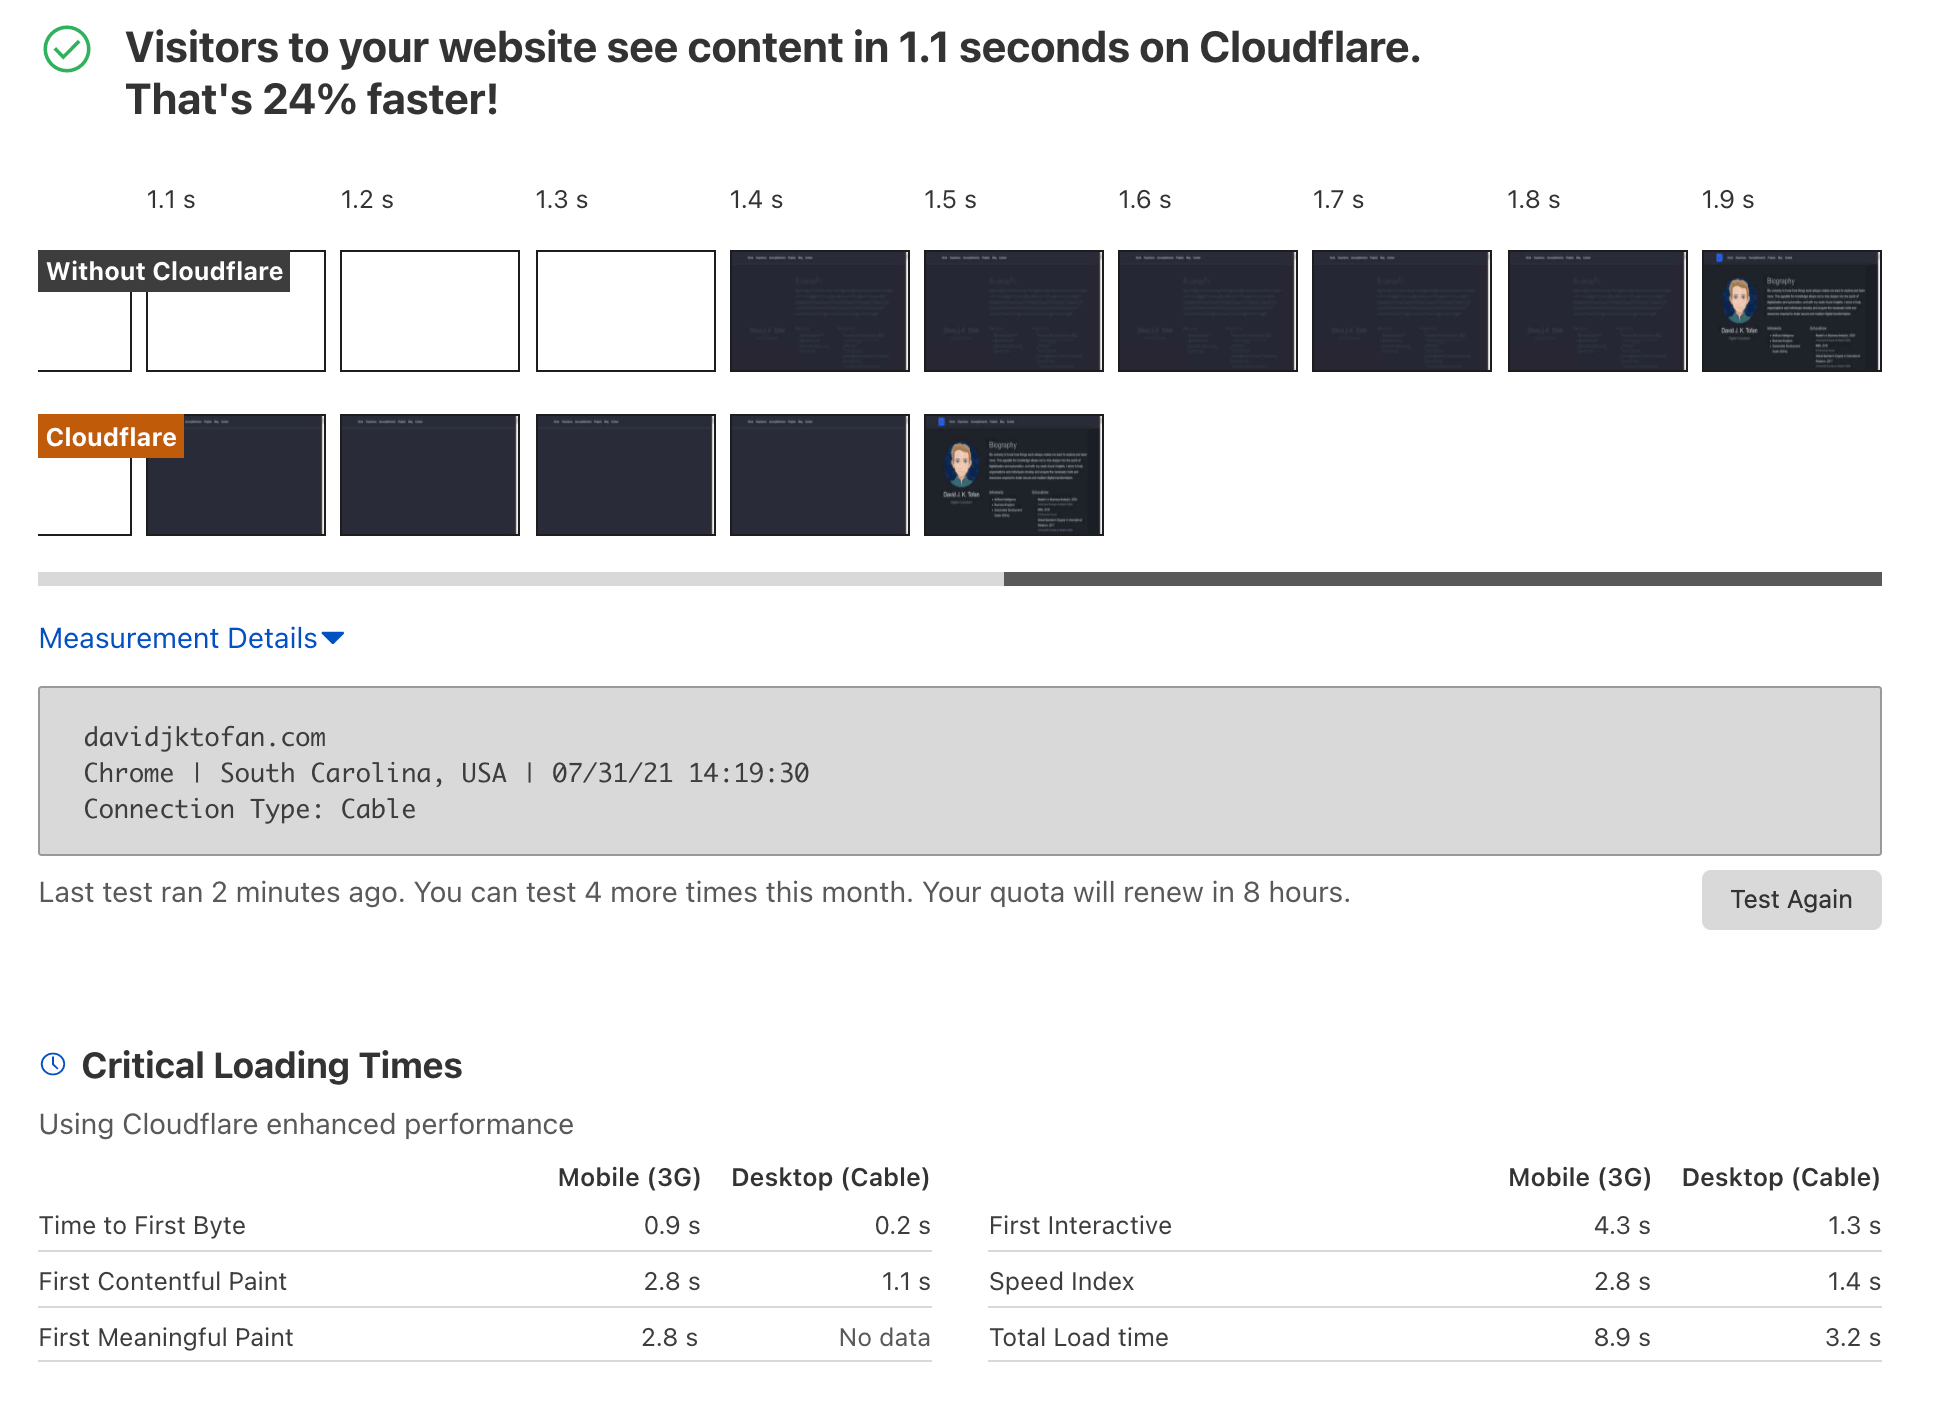
Step 5: Results
Finally, we analyze our website and check what has changed or improved:
- Cloudflare Diagnostic Center
- Security Headers
- Google PageSpeed Insights
- Google Mobile-Friendly Test
- Web Page Test
- DNSViz DNSSEC
- DNSSEC Analyzer
Conclusion
Coming soon! Still working on some stuff…
More on Cloudflare
David J. K. Tofan
Digital Consultant
I am a self-proclaimed world-citizen with an entrepreneurial spirit.